
I sometimes get questions on how I digitalize my images. I always draw by hand, and very little of my art is made with imaging software. However, a bit of touching-up is needed when you prepare an image for posting online. This will be a quick tutorial on how to use Photoshop to clean up a photo (I don’t have a scanner) of an ink drawing and make it look good for publishing on social media and/or websites.
I am not an expert on imaging software, but I’ve done quite a bit of trial and error on this, so I hope you find my advice helpful. I am sure there are many other ways of achieveing the same result, but this works for me. Feel free to post any tips and tricks in the comment section.
While I use Photoshop for this tutorial, I’m sure there are many similar programs that can be used to the same purpose.
Tools for drawing
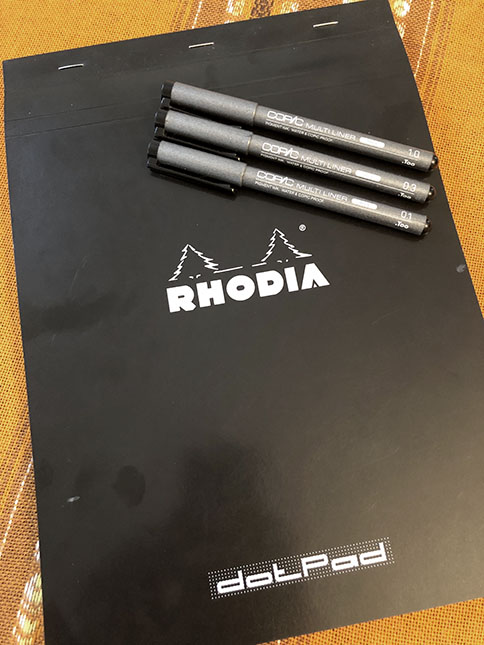
I sometimes get questions on what tools I use for my drawings, so let’s start with that. My favorite drawing paper is Rhodia Dot Pad. The texture of the paper is smooth, and I enjoy how ink markers behave on it. The dots are subtle, but I find them very useful for my style of art.
My preferred markers are Multiliners from Copic, however other brands like Pigma Micron and Uni Pin are also great pens.
Step 1 – take a photo of your drawing
I use a iPhone 8 to take the picture. Always try to take the photo in daylight, close to a window, and with several other light sources in the room (just switch on all your lamps). Daylight will make a lot of difference, as you can see from the below pictures (however in this tutorial I will work with the “No daylight” image, to show you that even that one can be cleaned up).
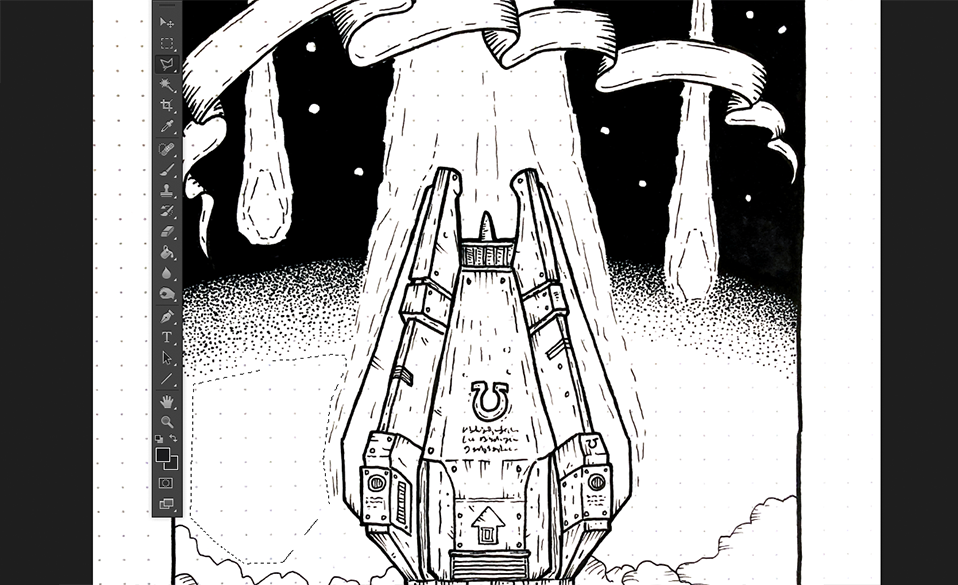
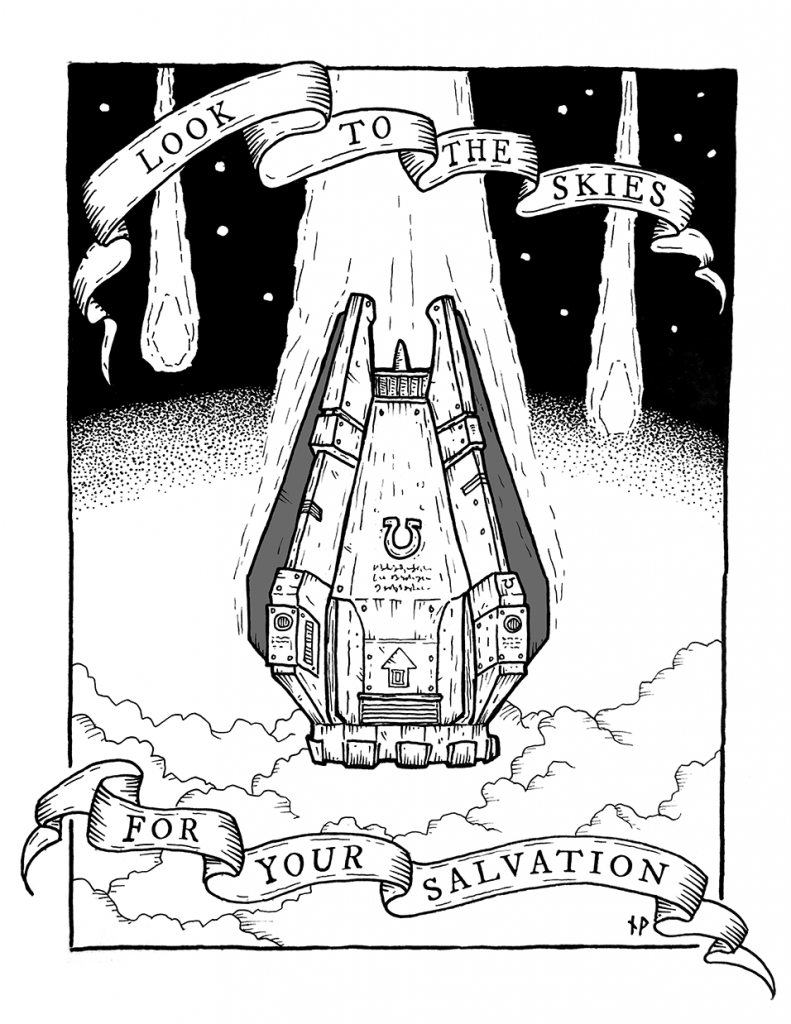
I picked a drawing I made of a space marine drop pod assault from the Warhammer 40.000 universe.

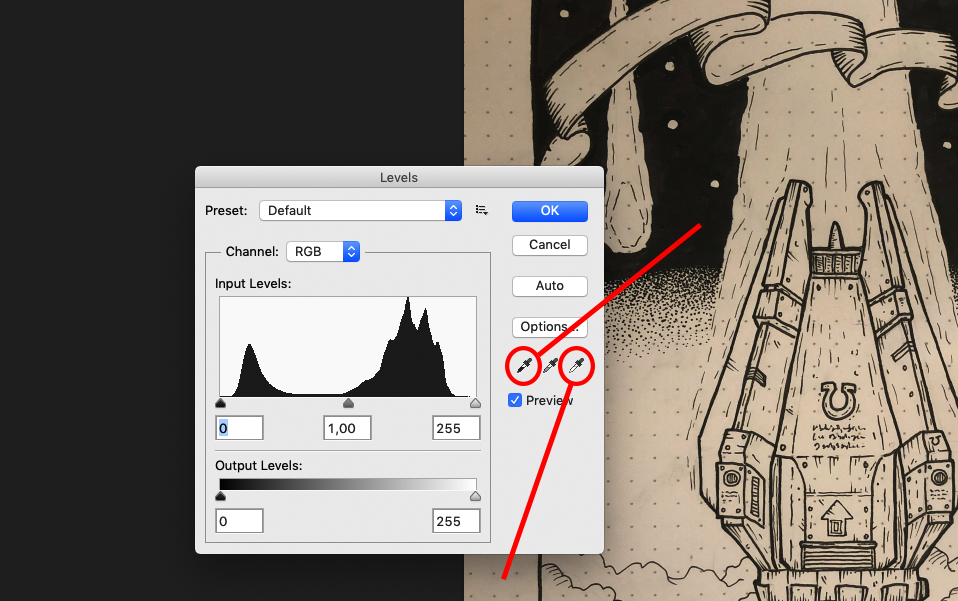
Step 2 – adjust levels
After cropping the image to your liking, go to image > adjustements > levels (or just hit command+L on a Mac).
Choose the black droplet tool and click the brightest black you can find in your drawing. This will make all black uniformly dark, and hide brush strokes and similar unintended variations.
Choose the white droplet tool and click the darkest white you can find in your drawing. This will make grey and yellowish tones uniformly white.
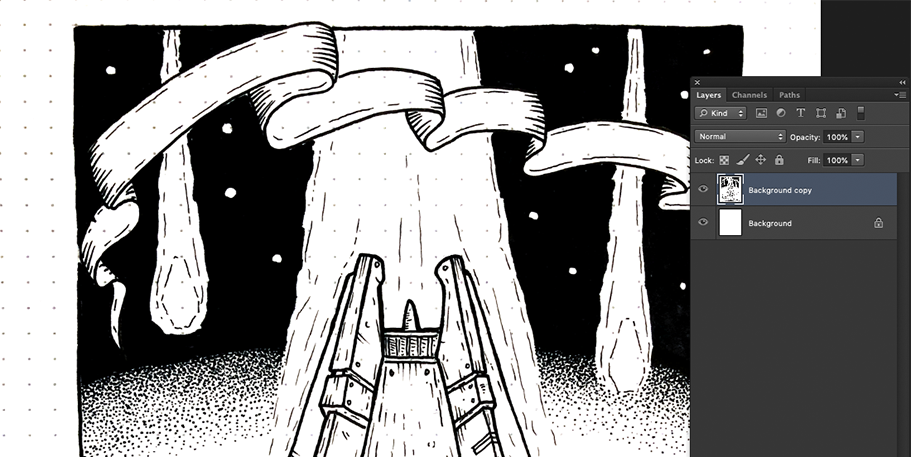
Step 3 – create a new layer for the drawing
Click the background layer, and drag it to the “create new layer” button in the bottom of the layer panel (or just hit Command+A, Command+C, Command+V) to create a new layer with the drawing, then fill the background layer with white.
Step 4 – erase the grid/dots
Use the polygonal lasso tool (L) to select large white areas in the drawing, and hit delete to get rid of the dots. Then use the eraser tool to remove the remaining dots that was hard to get with the lasso.
This will take some time, so be patient.
I’ve tried some other ways to get rid of the dots, for example by adjusting blending options in the layer, but in my experience this compromises the details in the drawing. Therefore I prefer to do it this way even if it’s a bit time consuming. Just put on a good album on Spotify and go to work.
Step 5 – finishing up
When all dots are removed and you’re happy, go ahead and flatten the image. I tend also to change the image mode from RGB to grayscale to make sure I get rid of any color information in the image (and to reduce file size).
I’ve added some text to the banners in this image, since my handwriting doesn’t really fit the style. I also added some grey to the fins in the background.
Finally adjust the size of the image, and save it as a PNG file (to avoid compression and reduced quality)
I hope you enjoyed this tutorial and found it helpful. Good luck and keep drawing! Make sure to follow me on Instagram, where I post more images, maps and tips: https://www.instagram.com/paths.peculiar/
More tutorials:
Copic link is broken, here is the new URL.
https://copic.jp/en/product/multiliner-sp/
Session zero & a little introduction to horror adventuring coming up. Excited to start this Thursday. Extra special thanks for the source material that I upgraded from-Hunted Closter- and i colorized and textured it- see it here~ https://www.facebook.com/Llogoth/ Thanks again- keep up the great work!
Hi,
Firstly amazing maps , you’ve really inspired me to do some of my own!
Secondly , I know some illustrators use blue pencil to draw in and some other map makers use blue isometric grid paper to draw on . They then use a method in Photoshop that removes the colour Blue, eliminating the need to go around with an eraser. Do you just prefer the way you work , just something you’ve got into and is tried and tested?
Cheers T
Hi, for my isoemtric drawings I use paper with blue grid. For the ones with dot grid I use Rhodia paper, and I don’t believe they have any with blue dots.
Thanks for the walk-through. I always wondered how you got rid of the dots.
No problem, glad you found it helpful!